Installing, setting up and testing Wazuh and Automating Agent installations
Introduction
I have ran Wazuh in the past to just ingest logs from multiple machines and perform simple searches, however, I’d like to revisit it as it’s been neglected over the last 2 years it’s been running.
I’d like to spin up a new instance and utilize more of the features the platform offers.
VM Setup
Wazuh has an installation script that automates the installation front to back, so I will be running that.
curl -sO https://packages.wazuh.com/4.14/wazuh-install.sh && sudo bash ./wazuh-install.sh -aUser setup
I’m going to create a seperate admin account to get rid of the default “admin account”:
- Index Management>Security>Internal Users>Create Internal User
- Backend roles:
admin
- Backend roles:
- Server Management>Security>Role mapping>Create role mapping
- Roles:
administrator - Map internal users: (the internal user just created)
- Roles:
Securing agent enrollment
- Set
use_passwordoption underossec_config>authin/var/ossec/etc/ossec.confto true - Set a password via
echo "[password]" > /var/ossec/etc/authd.pass - Set permissions via
chmod 640 /var/ossec/etc/authd.passandchown root:wazuh /var/ossec/etc/authd.pass - Restart the manager via
systemctl restart wazuh-manager
Enable log retention
I want to use Wazuh to index all logs collected, not just alerts.
In the /var/ossec/etc/ossec.conf file:
- Set
logalltoyesunder global - Set
logall_jsontoyesunder global
Edit the filebeat config at /etc/filebeat/filebeat.yml
- Adjust the config to enable archives:
filebeat.modules:
  - module: wazuh
    alerts:
      enabled: true
    archives:
      enabled: false
Restart filebeat via systemctl restart filebeat
Create the index on the dashboard:
- Dashboards Management>Dashboards Management>Index patterns>Create index pattern
- Name:
wazuh-archives-* - Time field:
@timestamp
- Name:
Enrolling first agent to test changes
The first agent will be on Windows, and will be installed via the following PowerShell commands:
Invoke-WebRequest -Uri "https://packages.wazuh.com/4.x/windows/wazuh-agent-4.14.7-1.msi" -OutFile "$env:tmp\wazuh-agent.msi"

msiexec.exe /i "$env:tmp\wazuh-agent.msi" /q `
  WAZUH_MANAGER="wazuh-01.example.invalid" `
  WAZUH_REGISTRATION_SERVER="wazuh-01.example.invalid" `
  WAZUH_REGISTRATION_PASSWORD="[password]" `
  WAZUH_AGENT_NAME="myLaptop"

Start-Service wazuhsvc
The agent has appeared in Wazuh.
Logs are now viewable in Explore>Discover>wazuh-archives-*
Basic query
Log a basic event to the Windows event log:
Write-EventLog -LogName Application -Source "Application" -EventId 9999 -EntryType Information -Message "Wazuh test event - $(Get-Date)"After waiting for ~30 seconds, we should be able to see it by searching the archive:
agent.name : "[Agent Name]" and data.win.eventdata.data : *Wazuh*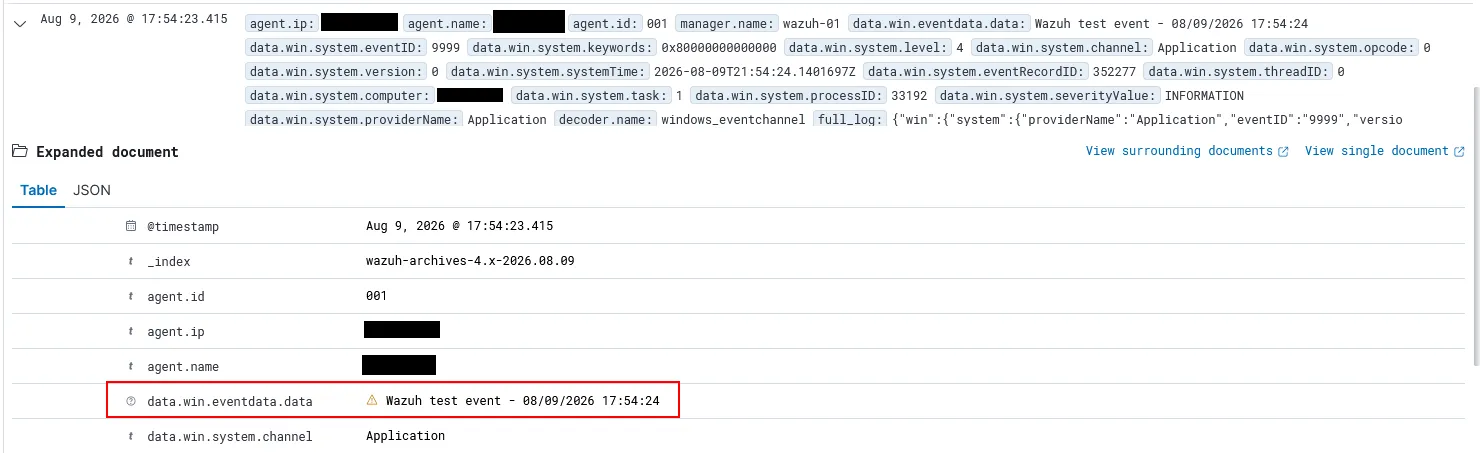
And testing user account creation, deletion, group membership modifications on the Windows host, those had appeared as alerts as well.
Automated agent installation using Ansible
I have 50+ agents to install, obviously manual installation might take all afternoon, so Ansible is going to be beneficial here.
I asked Claude to assist in generating a playbook to:
- Uninstall existing Wazuh agent (if present)
- Clean up any existing agent data on the file system
- Install and start the Agent
It came up with the following:
Main Task File:
---
- name: Fail fast on non-Debian targets
  ansible.builtin.fail:
    msg: "This role currently only supports Debian/Ubuntu hosts. ansible_os_family={{ ansible_os_family }}"
  when: ansible_os_family != "Debian"

- name: Run Debian/Ubuntu agent install flow
  include_tasks: linux_debian.yml
Linux/Debian Task File:
---
- name: Check if wazuh-agent package is currently installed
  ansible.builtin.command: dpkg-query -W -f='${Status}' wazuh-agent
  register: wazuh_pkg_check
  failed_when: false
  changed_when: false

- name: Set fact for existing install
  ansible.builtin.set_fact:
    wazuh_already_installed: "{{ 'install ok installed' in wazuh_pkg_check.stdout }}"

- name: Stop existing wazuh-agent service (pre-uninstall)
  ansible.builtin.systemd:
    name: wazuh-agent
    state: stopped
  when: wazuh_already_installed
  failed_when: false

- name: Purge existing wazuh-agent package
  ansible.builtin.apt:
    name: wazuh-agent
    state: absent
    purge: true
  when: wazuh_already_installed

- name: Remove leftover /var/ossec directory
  ansible.builtin.file:
    path: /var/ossec
    state: absent
  when: wazuh_already_installed

- name: Install prerequisite packages for repo/key management
  ansible.builtin.apt:
    name:
      - gnupg
      - ca-certificates
      - apt-transport-https
    state: present
    update_cache: true

- name: Remove legacy apt-key managed Wazuh key (if present)
  ansible.builtin.apt_key:
    url: https://packages.wazuh.com/key/GPG-KEY-WAZUH
    state: absent
  failed_when: false
  ignore_errors: true

- name: Ensure keyrings directory exists
  ansible.builtin.file:
    path: /usr/share/keyrings
    state: directory
    mode: '0755'

- name: Download Wazuh GPG key
  ansible.builtin.get_url:
    url: https://packages.wazuh.com/key/GPG-KEY-WAZUH
    dest: /tmp/GPG-KEY-WAZUH
    mode: '0644'
    force: true

- name: Dearmor Wazuh GPG key into keyring
  ansible.builtin.command:
    cmd: gpg --yes --dearmor -o /usr/share/keyrings/wazuh.gpg /tmp/GPG-KEY-WAZUH
    creates: /usr/share/keyrings/wazuh.gpg

- name: Set permissions on Wazuh keyring
  ansible.builtin.file:
    path: /usr/share/keyrings/wazuh.gpg
    mode: '0644'

- name: Remove legacy Wazuh apt repository file (list format, unsigned)
  ansible.builtin.file:
    path: /etc/apt/sources.list.d/wazuh.list
    state: absent

- name: Add Wazuh apt repository (signed-by keyring)
  ansible.builtin.apt_repository:
    repo: "deb [signed-by=/usr/share/keyrings/wazuh.gpg] https://packages.wazuh.com/4.x/apt/ stable main"
    filename: wazuh
    state: present

- name: Update apt cache
  ansible.builtin.apt:
    update_cache: true

- name: Install wazuh-agent with enrollment env vars
  ansible.builtin.apt:
    name: "wazuh-agent={{ wazuh_agent_version }}-*"
    state: present
  environment:
    WAZUH_MANAGER: "{{ wazuh_manager_ip }}"
    WAZUH_REGISTRATION_SERVER: "{{ wazuh_manager_ip }}"
    WAZUH_REGISTRATION_PASSWORD: "{{ wazuh_registration_password }}"
    WAZUH_AGENT_NAME: "{{ inventory_hostname }}"

- name: Reload systemd daemon
  ansible.builtin.systemd:
    daemon_reload: true

- name: Enable and start wazuh-agent
  ansible.builtin.systemd:
    name: wazuh-agent
    enabled: true
    state: started
For the first pass, I ran the playbook against ~20 hosts, and confirmed that logging was reaching Wazuh.
Syslog logging
Next I wanted the ability to monitor and decode FortiGate logs and generate alerts, by ingesting the syslog into Wazuh, however, I don’t want the Wazuh manager server listening for syslog directly, instead we will install a syslog server on a machine with the Wazuh agent along side it.
Setting up rsyslog
I ran the Ansible playbook to provision the agent on a new host, we will install rsyslog now
sudo apt install rsyslog -yCreate a new config file for rsyslog at /etc/rsyslog.d/01-wazuh-forward.conf:
module(load="imudp")
module(load="imtcp")

ruleset(name="networkOnly") {
    action(type="omfile" file="/var/log/syslogtowazuh.log")
    stop
}

input(type="imudp" port="514" ruleset="networkOnly")
input(type="imtcp" port="514" ruleset="networkOnly")
Restart rsyslog:
sudo systemctl restart rsyslogSend syslog to server confirm syslog file exists:
logger -n localhost -P 514 -d "test message"

cat /var/log/syslogtowazuh.log
2026-08-10T22:20:52.423654+00:00 nsyslog-01 root test message
Create a logrotate at /etc/logrotate.d/wazuh-forward:
/var/log/syslogtowazuh.log {
    daily
    rotate 14
    compress
    delaycompress
    missingok
    notifempty
    create 0640 root adm
    sharedscripts
    postrotate
        systemctl kill -s HUP rsyslog.service >/dev/null 2>&1 || true
    endscript
}
Test log rotation:
sudo logrotate -f /etc/logrotate.d/wazuh-forward
cat /var/log/syslogtowazuh.log
Setting up ossec to pick up logs
We will need to setup the agent to pick up the logs, and the easiest way to manage this with a lot of syslog forwarders, is to put all of the agents which are going to be fowarding syslog into a Agent Group in Wazuh.
Agents Management>Groups
- Create a group and ensure agents are a member of that group
- Edit the Agent Group for your syslog forwarders to pick up the log file:
<agent_config>
  <localfile>
    <log_format>syslog</log_format>
    <location>/var/log/syslogtowazuh.log</location>
  </localfile>
</agent_config>- Save
- Wait a few moments
Send another test message and confirm you see it in the archive index.
Setting up FortiGate to log to the syslog server
Wazuh already has decoders built in for FortiGate, so all should need to be done is to setup syslog within the FortiGate:
config log syslogd setting
    set status en
    set server [the syslog server]
    set mode reliable
end
Watch the syslog flood into the server:
tail -f /var/log/syslogtowazuh.logImportant note to get traffic logs working
I had to adjust the built in FortiGate log decoders to be indexed, for some reason the decoders clash with Elastic Search’s service field.
I found this in the Filebeat log:
mapper_parsing_exception: object mapping for [data.service] tried to parse field [service] as object, but found a concrete valueI fixed this by renaming instances of service to service_name
root@wazuh-01:~# cp /var/ossec/ruleset/decoders/0100-fortigate_decoders.xml /var/ossec/ruleset/decoders/0100-fortigate_decoders.xml.bak
root@wazuh-01:~# grep -n "order>service<" /var/ossec/ruleset/decoders/0100-fortigate_decoders.xml
631:  <order>service</order>
1425:  <order>service</order>
root@wazuh-01:~# sed -i 's/<order>service<\/order>/<order>service_name<\/order>/' /var/ossec/ruleset/decoders/0100-fortigate_decoders.xml
root@wazuh-01:~# systemctl restart wazuh-manager
This is a modification to the built in rule set, so this may be overwritten during updates later on.
Conclusion
That’s it, Wazuh is up and running. It’s slowly being rolled out to all of the hosts on the network (again), and ingesting logging and creating alerts based off the built in rules.